|
<< Click to Display Table of Contents >> Configure main library and branch library in controller |
  
|
|
<< Click to Display Table of Contents >> Configure main library and branch library in controller |
|
The system consists of main libraries and branch libraries as a hierarchy. At least one main library and one branch must be created. In the simplest setup, these are the same actual library.
Start the SOL Administrator. You may get an error at first start when not everything is correctly configured, but that can be safely ignored. At first start, the system is likely to look like this:

Admin software - no connection and no configuration tab page
By default it will display the library being closed, because there is nothing configured. There is also no "Library configuration" tab page visible. This is because the default view is meant for library staff, and has only monitoring and pictures and schedule related options available.
To get the config tab to show up, close the admin tool and go to Management utility. I MU, change the setting under SelfOperatedLibraryAdmin / [machine name] / User interface / User type to Technician:

Setting the Admin tool interface in Management utility
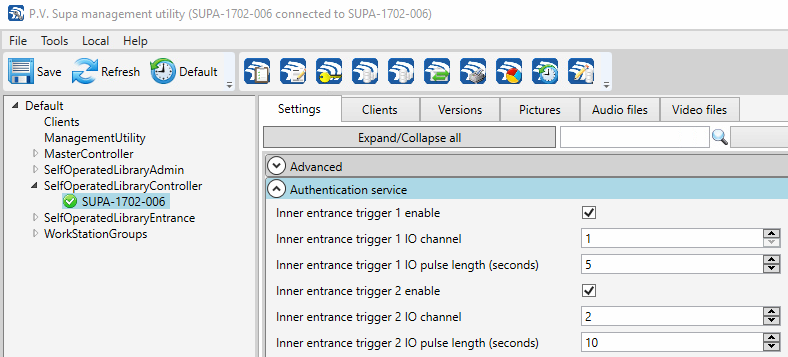
While in Management utility, there are some other settings to configure for the SelfOperatedLibraryController. In Authentication service settings group, set the Inner triggers 1 and 2 to enabled, and set their times to for example 5 and 10 seconds. These triggers are activated when the entrance application gets a valid patron and pin code, and they control the IO module channels. Thus, with this setting, if a valid login is received, the IO channels 1 and 2 will be set for 5 and 10 seconds respectively.
Important note! The channel numbering in the Omron IO module begins from 0 (zero), while in the Management utility settings the numbering begins from 1. So if you connect the lock cabling to Omron IO channel 0, it is controlled by channel 1 in the MU settings. This is due to some initial decisions made, to speak of "first channel" when connecting things to first available slot - we feel it makes more sense for the first channel to have number 1 than zero.
The settings should be as follows:
Next, make sure the serial port parameters in setting IO Service / Serial port parameters is correct; by default a unit provided from Supa should have port 2 selected, and the IO module connected to the COM2 port of the main computer.
To enable all services of the system, open the Services settings group and enable all serivces that are used in this system. You can safely enable all if you do not know what are needed, they use very little resources when not used. These are all the services that the system can host:
Audio service is responsible for playing audio announcements. It should be running on the computer from which the speaker system gets input.
Authentication service is used by the entrance software to validate patron identifiers and PIN codes, when a user attempts to access the library during self operated hours. It handles the SIP connection to the library system and also manages the white-/blacklist of patrons that are allowed or denied entry, regardless of what the library system says.
IO service handles the IO module, sending commands to set or unset channels, and reading input values. This is required if any doors are controlled or monitored, as well as lights.
Picture service is the service that receives pictures from cameras. It has a built in FTP server which receives and stores pictures, and an indexing service which creates thumbnails and updates the main database index of pictures. Pictures are stored as files on the file system, only the index is stored in the database.
Scheduler service manages the library schedule, setting states and IO commands at selected times.
To set where the camera pictures are stored, open the Picture service settings group. The default value in FTP server's root folder is C:\FtpRoot - typically you do not want this on the system disk. The units provided by Supa will have a larger disk in the main computer, so set this to something like D:\pictures . The folder does not have to exist, it will be created automatically by the service.
Save settings in MU. To get the service to react to the new settings, you must reload the settings - they are not automatically updated, to prevent unfinished work from causing problems in the system. Select the controller in Management utility, right click on it and select Reload settings immediately:

Reloading library controller settings in Management utility
This will cause the library controller to restart the internal services. After this you can restart Admin software, and now you should see the library configuration tab in the Admin software. Open the tab, and you will see only one library controller server listed as Unassigned:

Unassigned library controller server
This means that the Admin software finds one library controller service, but it has not been connected to any library. It can't be connected before any libraries exist, so click on the green plus sign to create a library. Give it a name that makes it easy to identify. Then select it from the tree and click on the green plus sign next to the name, to create a branch. Name it correctly, and save. Now you should have something like the following:

Admin software - first library and branch created
Next thing is to select the branch library. This will make settings of that branch to appear on the right side. Select Controller servers from the settings and expand it. You will see two boxes, on with the controller servers assigned to this branch, and one with unassigned - not connected to any branch - servers. Select the unassigned server and click on the pencil icon to move it to the Branch's control servers list.
The control server is now assigned to this branch, and can be further configured.